[Step-by-Step] People Analytics with Artificial Intelligence

Install or Update Python (if necessary):
Download the latest version of Python from the official Python website.
https://www.python.org/
Follow the installation instructions for your operating system.
Welcome to Python.org
The official home of the Python Programming Language
www.python.org
Refer to the Beginner’ ners Guide
https://www.python.org/about/gettingstarted/
Python For Beginners
The official home of the Python Programming Language
www.python.org
Open "Terminal" and type in python3 -- version to check the version.
And, simply type in python3 to check the further options.
Type print ("Hello World") to check functining the Python.

Quit or Control Z exit.
Python Launcher Click
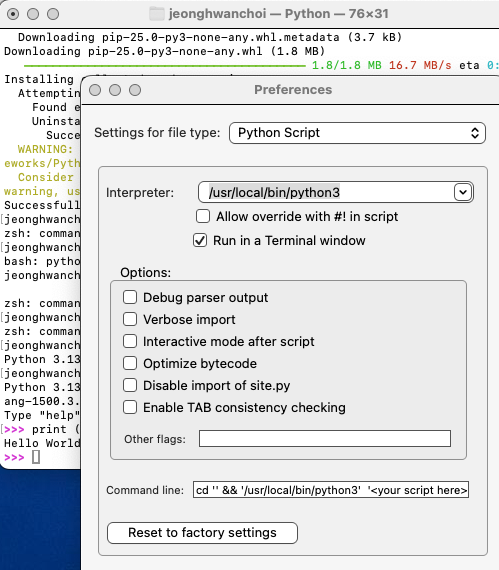
IDLE tool

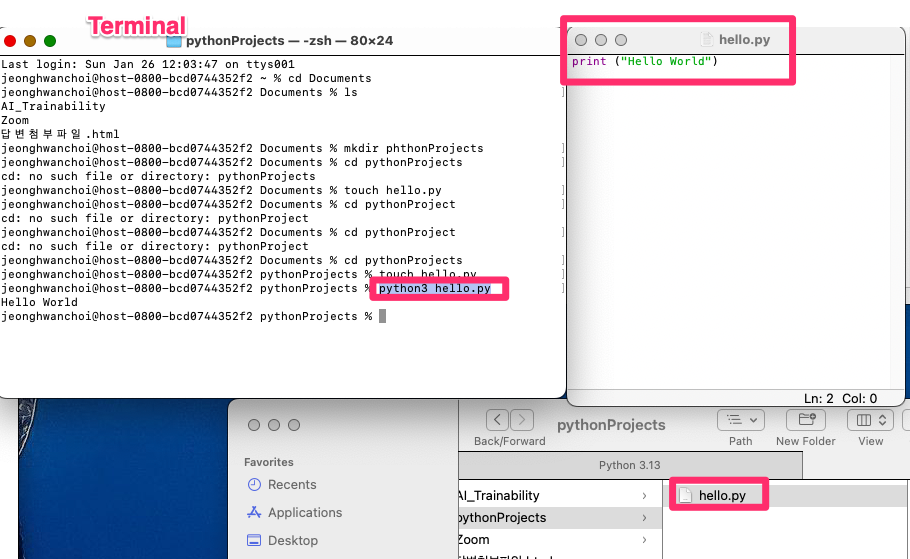
Close and return Mac "Terminal" and
cd Document :Change Directory Document
ls: List
mkdir pythonProjects: Make Directory of pythonProjects
cd pythonProjects: Change Directory to pythonProjects
touch hello.py: Create a hello.py Python file.

Double clik the hello.py, and it open the file at the IDLE software
Input python programming at the ***.py program at IDLE, then save.
At Terminal, type in below to run the python code.
python3 ****.py
Check the python manager program (pip3) to handle the third party programs.
pip3 --version
Installing Langchain
At Macbook Terminal, Check version and Activate Virtual Environment
python3 -- version : Check python version version
python3 -m venv langchain_env : Create a folder of langchain_env (langchain environment)
source langchain_env/bin/activate : Activate Virtual Environment

Install Langchain via pip (Python Management Program)
python3 -m pip install langchain : installing langchain (collecting and downloading all langchain and install them)
optional: Install specific integration (OpenAI, Deepseek, Vector Database like Pinecone, and Web scraping)
python3 -m pip install openai: Install specific integrations for OpenAI API
python3 -m pip install deepseek: Install specific integrations for DeepSeek
python3 -m pip install pinecone-client : Install specific integrations for pinecone
python3 -m pip install requests beautifulsoup4 : Install specific integrations for web scraping
Install All Extras:
python3 -m pip install langchain[all] : Install all extras of langchain
At terminal, Upgrade Langchain:
python3 -m pip install --upgrade langchain
python3 -m pip install langchain-community
Import OpenAI module:
Open a Python3 interactive shell
python3 : open the python3 interactive shell , then, cursor changed to >>>> (this cursor indicate the python environment)
Set the API Key as an Environment Variable (OpenAI) at the outside of Python shell (type Exit and get out the Python shell, and input this)
export OPENAI_API_KEY="Your OpenAI API Code here"
Option: Use a .env file
makefile outside of python environment:
Touch OPENAI_API_KEY=OpenAI API Key.env
Install the python-dotenv package:
python3 -m pip install python-dotenv
Load the .env file in your Python script: (
Python3 : go into the Python environment >>>> .
from dotenv import load_dotenv
import os
load_dotenv() : # Load environment variables from the .env file
api_key = os.getenv("OPENAI_API_KEY")
from langchain.llms import OpenAI
llm = OpenAI(temperature=0.7, openai_api_key=api_key)
response = llm("Tell me a joke.")
print(response)
Verify the Environment Variable: To check if the OPENAI_API_KEY is set, run the following command in your terminal:
echo $OPENAI_API_KEY
from langchain.llms import OpenAI : Import Langchain.llms module of OpenAI
"Remark: Open AI API should be charged with sufficient amont of money"
Testing LangChain Script
llm = OpenAI(temperature=0.7)
llm = OpenAI(temperature=0.7, openai_api_key="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")
response = llm("Tell me a joke.")
print(response)
Results:
Why couldn't the bicycle stand up by itself? Because it was two-tired.
Below is a concise guide on how you can create and manage a multi-agent workflow—Writer, Reviewer, and Editor—using LangChain and Python to enhance your academic writing in the management field. You can optionally integrate R for statistical checks or data analysis.
1. Overview of the Multi-Agent System
- Writer Agent:
- Generates drafts based on a prompt (e.g., a research question or topic).
- Adheres to Academy of Management (AOM) guidelines, ensures theoretical underpinnings, and employs scholarly style.
- Reviewer Agent:
- Critiques the draft, checks logical consistency, identifies gaps, and suggests improvements.
- Ensures coherence with established management theories and references.
- Editor Agent:
- Refines language, corrects grammar, aligns with APA style, and polishes the manuscript for clarity.
- Maintains consistent tone and scholarly voice.
2. Setting Up Your Environment
- Install Python 3.7+
- Verify installation with:
bashCopyEditpython3 --version
- Verify installation with:
- Create a Virtual Environment (recommended)
-
bashCopyEditpython3 -m venv multiagent_env source multiagent_env/bin/activate # Mac/Linux # or .\multiagent_env\Scripts\activate on Windows
- Install Necessary Packages
-
bashCopyEditpip install langchain openai # Optional for advanced usage pip install chromadb faiss-cpu # for vector storage pip install pandas spacy nltk # for text analysis pip install rpy2 # to integrate R if needed
3. Drafting a Basic Multi-Agent Framework
Step 1: Imports and Configuration
Step 2: Define Agent Functions
- Writer Agent
-
pythonCopyEditdef writer_agent(prompt: str) -> str: """Generates an initial academic draft following AOM guidelines.""" system_prompt = """ You are a high-level academic writer. Adhere to Academy of Management (AOM) guidelines, use a clear, scholarly voice, and incorporate appropriate theoretical frameworks. """ response = llm.invoke([ SystemMessage(content=system_prompt), HumanMessage(content=prompt) ]) return response.content
- Reviewer Agent
-
pythonCopyEditdef reviewer_agent(draft: str) -> str: """Critiques the draft, checking for logical consistency, coherence, and theoretical rigor.""" system_prompt = """ You are an expert peer reviewer for a top-tier management journal. Provide detailed feedback, suggesting theoretical enhancements and structural improvements. """ response = llm.invoke([ SystemMessage(content=system_prompt), HumanMessage(content=draft) ]) return response.content
- Editor Agent
-
pythonCopyEditdef editor_agent(draft: str) -> str: """Edits the draft for grammar, style, and APA compliance.""" system_prompt = """ You are a professional academic editor. Ensure APA style, correct grammar, and improve overall readability and clarity. """ response = llm.invoke([ SystemMessage(content=system_prompt), HumanMessage(content=draft) ]) return response.content
Step 3: Convert Each Function into a LangChain Tool
Step 4: Initialize the Multi-Agent System
Step 5: Create a Workflow
4. Integrating R for Statistical and Empirical Analysis (Optional)
If you want to run R scripts or packages for advanced statistical modeling:
- Install R and rpy2
-
bashCopyEditpip install rpy2
- Use R from Python
-
pythonCopyEditimport rpy2.robjects as ro from rpy2.robjects.packages import importr # Example: Load ggplot2 in R ggplot2 = importr('ggplot2') # Example: Create R data frame and run linear regression ro.r('df <- data.frame(x = rnorm(50), y = rnorm(50))') ro.r('model <- lm(y ~ x, data=df)') summary_output = ro.r('summary(model)') print(summary_output)
You can then integrate statistical findings back into your writing process by allowing the Writer Agent to incorporate those results or having the Reviewer Agent critique them.
5. Potential Enhancements
- Automated Citation Management
- Integrate a citation tool or a vector database (e.g., Chroma, FAISS) containing research papers and references.
- Let your agents retrieve relevant sources and insert citations.
- Template-Based Outputs
- Provide journal-specific templates (e.g., Academy of Management Journal) for the Writer Agent to follow.
- Section-by-Section Review
- Have agents work section by section (Introduction, Literature Review, Methods, Results, Discussion, Conclusion) for more granular feedback.
- Version Control
- Consider storing each agent’s output in a version control system (e.g., Git) for tracking changes and reverting if needed.
6. Best Practices and Tips
- Use a High-Quality LLM: For sophisticated academic text, models like GPT-4 can produce more coherent, in-depth analysis.
- Temperature Settings: Experiment with lower temperatures for more factual and consistent outputs.
- Prompt Engineering: Provide clear instructions to each agent, referencing style guidelines, desired length, tone, and references as needed.
- Citation Checks: Regularly verify references to ensure accuracy and academic integrity.
Conclusion
By defining Writer, Reviewer, and Editor agents in LangChain, you can create a streamlined academic writing pipeline tailored to AOM standards. Incorporating R for empirical analysis can further enrich your manuscripts with robust, data-driven insights.
Feel free to adapt the approach to fit your exact needs—whether that’s additional agents, deeper citation management, or more advanced statistical methods. Good luck refining your multi-agent academic writing system!
===========
Langchain example (Memory, Korean)
from langchain.memory import ConversationBufferMemory
=============
2025. 01. 26: Initially archive.
=============
OpenAI Developer Platform for Python:
from openai import OpenAI
client = OpenAI()
completion = client.chat.completions.create(
    model="gpt-4o",
    store=True,
    messages=[
        {"role": "user", "content": "write a haiku about ai"}
    ]
)
OpenAI Assistant API Quickstart:
https://platform.openai.com/docs/assistants/quickstart


댓글